
Every home has one. The junk drawer. The place where good intentions go to die alongside dead AA batteries, a mystery key, seventeen takeout menus, and scissors that are never there when you actually need them. I used to tell myself it was just part of having a real, lived-in home. Then I spent 45 minutes looking for a thumbtack while my kid sat at the table waiting to finish a school project. That was the last time the junk drawer beat me. Within two days I had it organized with clear plastic bins, and it has stayed that way for eight months now.
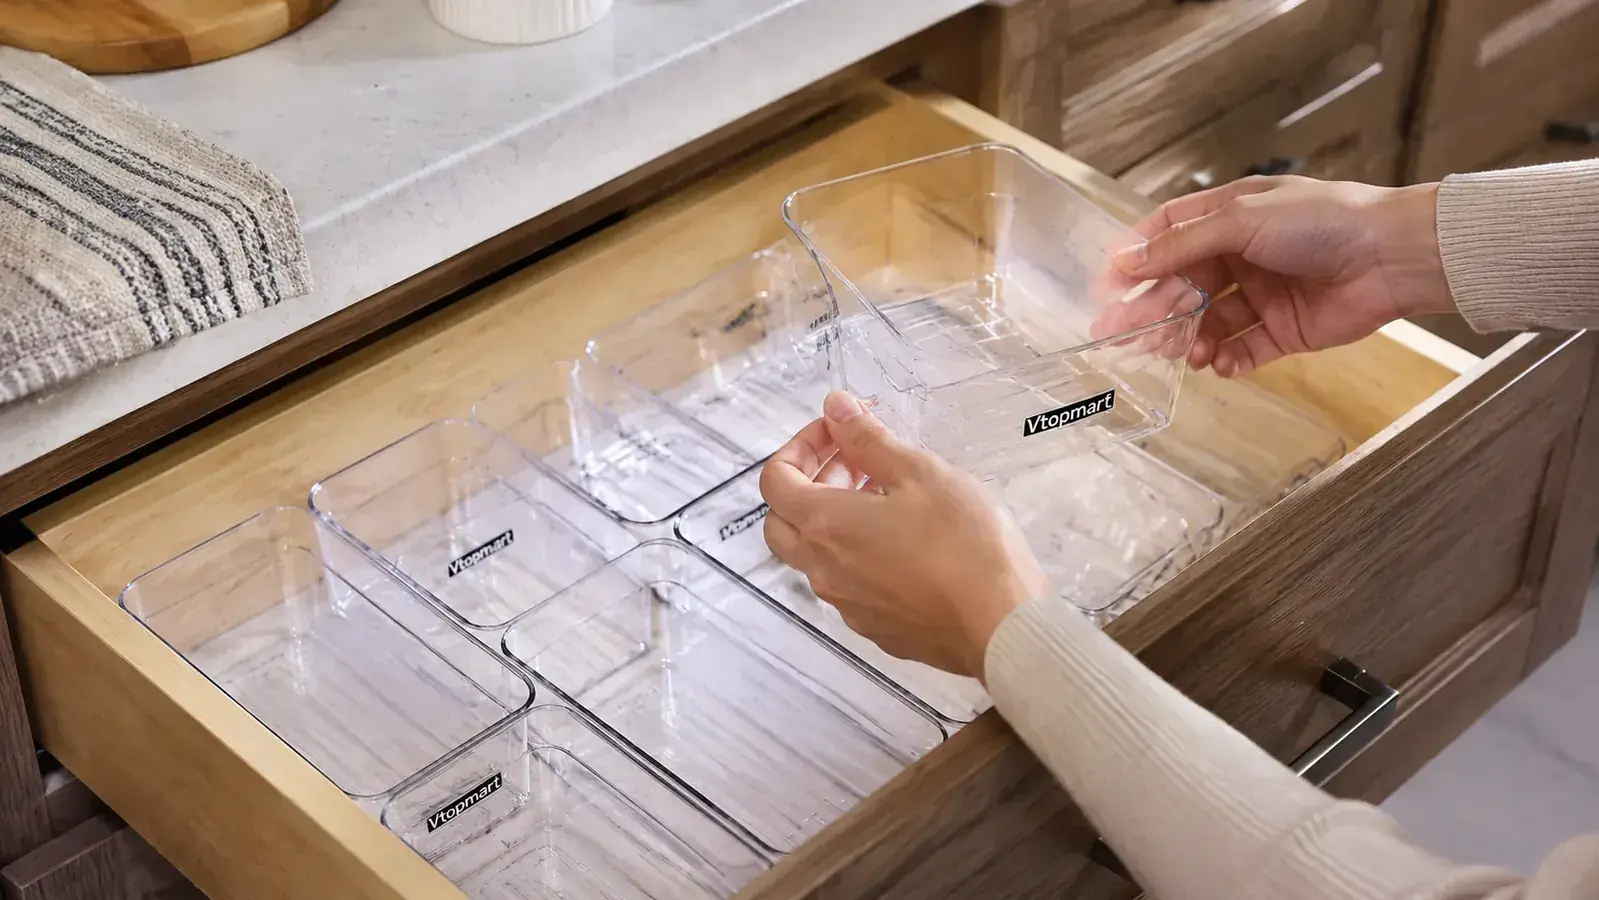
The fix is not complicated, but it does require a specific approach. Dumping everything into a single flat insert tray and calling it done does not work. The drawer fills back up within two weeks because nothing has a real, defined home. What actually works is using clear plastic bins in multiple sizes, grouped by category, with labels, so your brain always knows exactly where things live and can put them back without thinking. That is the whole system. I have used the Vtopmart 25-piece clear plastic drawer organizer set in three different drawers in my house, and the junk drawer transformation is the one that still makes me smile every time I open it. Here is exactly how I did it, step by step.
Your junk drawer is one 45-minute project away from never annoying you again.
The Vtopmart 25-piece clear plastic set comes in four sizes so you can fill almost any drawer layout without gaps or wobble. Over 48,000 Amazon reviewers agree it is the easiest way to go from chaos to calm.
Amazon Check Today's Price on Amazon →Step 1: Pull Everything Out of the Drawer Completely
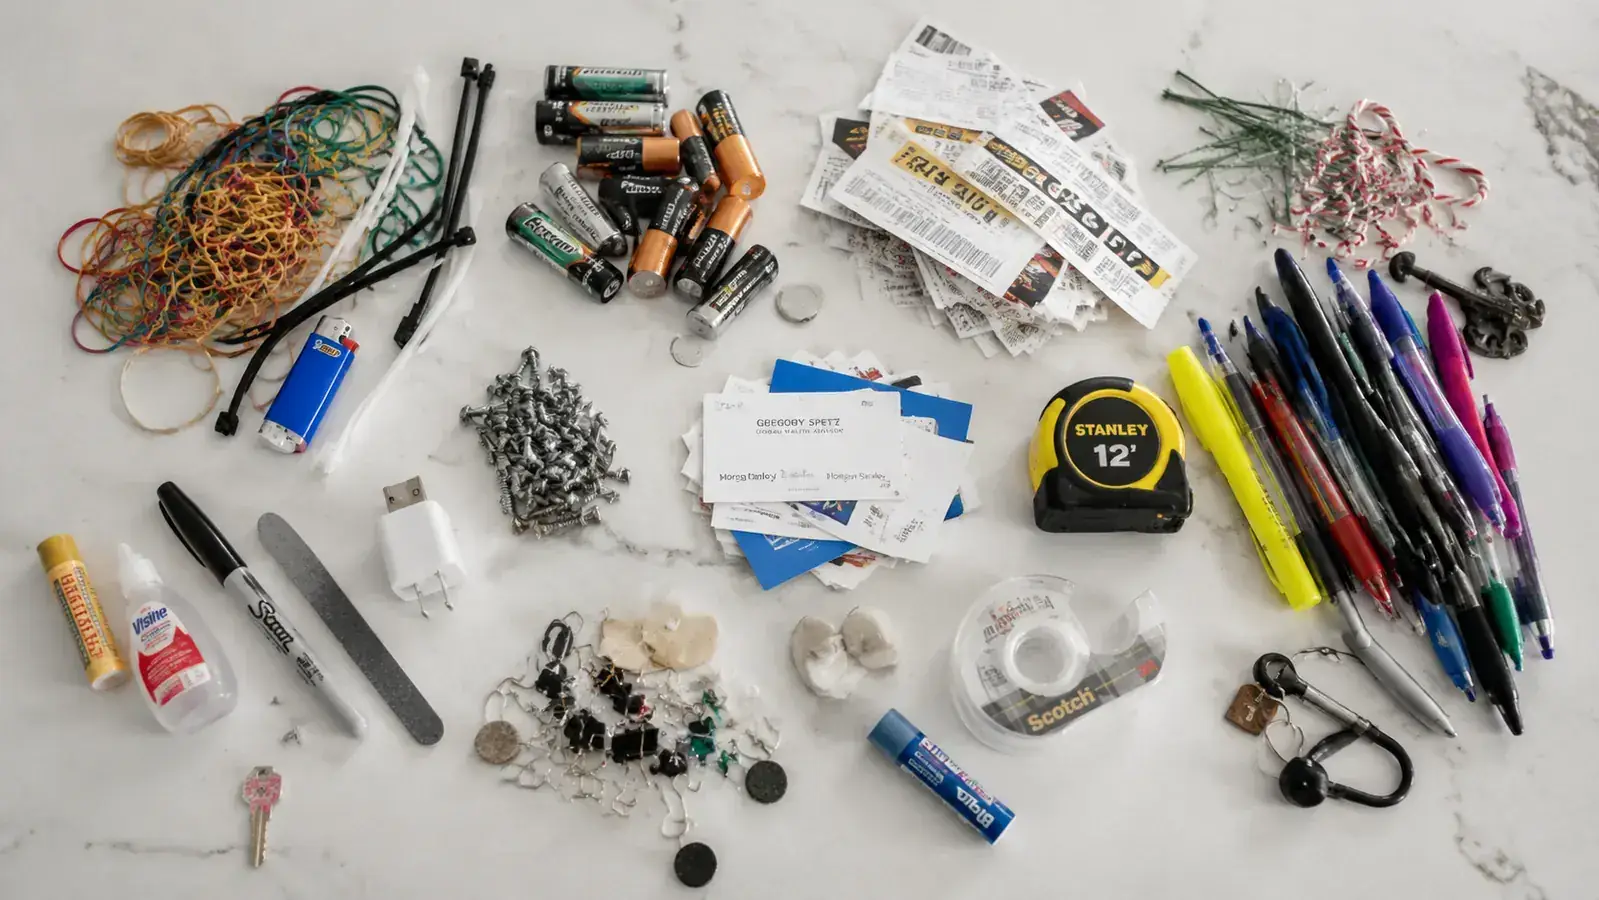
This step is non-negotiable. You cannot organize around existing junk. Set aside 20 to 30 minutes, pull the drawer all the way out of the cabinet if you can, and dump every single item onto your counter or kitchen table. Yes, everything. That includes the ancient ketchup packet, the button that fell off a shirt two years ago, and the USB cable for a device you recycled in 2022. It all comes out.
The psychological effect of seeing everything at once is genuinely powerful. When it is all in the drawer, the mess feels vague and bottomless. Spread out on a flat surface, it feels concrete and solvable. Lay items out so nothing is stacked on top of anything else. That way you can actually see the full inventory of what you have been storing before you start deciding what deserves to stay.
While the drawer is empty, take 30 seconds to wipe it out. A damp cloth removes the grime and crumbs that accumulate over years of random items sliding around the bare wood or plastic lining. A clean surface makes the bins feel more intentional when they go in, and it also means any future spills or dust show up quickly instead of hiding in a layer of old gunk.
Step 2: Purge Ruthlessly Before You Sort a Single Thing
Grab a trash bag and set a donation box nearby. Anything expired, broken, or mystery-origin goes in the trash immediately without deliberation. I tossed 23 items from my junk drawer during the first purge, including two pen caps with no pens attached, three dried-out markers I kept thinking I would find the matching pens for, an expired coupon from 2021, and a wall anchor that belongs to a shelf I no longer own. If you have not needed it in over a year and cannot name what it belongs to, it goes.
A few categories that trip people up during purging: duplicate tools (you do not need four tape measures in one drawer, pick the best one and let the others go), takeout menus for restaurants that have closed or that you never call anymore, and owner's manuals for appliances you no longer own. Keep the manuals that are current, but store them in a dedicated folder or binder somewhere intentional rather than loose in the junk drawer where they take up half the space. The rule I use is this: if the item has a genuinely better home elsewhere in the house, relocate it now. The junk drawer is not a permanent address for things that belong in the toolkit, the medicine cabinet, or the craft bin.
Step 3: Group What Stays into Clear Categories
Once you have finished purging, sort the survivors into rough piles by category on your counter. Do not reach for the bins yet. This step is about understanding what you actually have before you commit to any layout. Common categories for a kitchen junk drawer include writing tools (pens, pencils, markers, highlighters), batteries, small tools (a screwdriver or two, tape measure, utility knife, hammer if it fits), tape and adhesives, rubber bands and twist ties, small hardware (loose screws, picture hooks, wall anchors), and miscellaneous short cables or chargers that you actually use.
Look at the relative size of each pile before you do anything else. A large pile of pens tells you that category needs a longer or wider bin. A small pile of rubber bands might fit comfortably in one of the compact square bins from the Vtopmart set. Let the actual pile sizes guide which bin sizes you assign to each category. The 25-piece Vtopmart set includes four distinct sizes, so you have genuine flexibility here. The long narrow bins handle pens, pencils, and cables well. The medium rectangular bins handle batteries and small tools. The small square bins are perfect for rubber bands, thumbtacks, and loose hardware like screws and wall anchors.
Step 4: Measure Your Drawer and Plan the Bin Layout Before You Place Anything
Before you place a single bin, measure your drawer interior. Width, depth, and height all matter. Standard kitchen junk drawers typically run about 18 to 22 inches wide and 16 to 20 inches deep. The Vtopmart bins are designed to nest and combine within a standard drawer interior, but the exact configuration depends on your specific dimensions. I sketch a rough grid on a scrap of paper so I can visualize a few different arrangements before committing. It takes about three minutes and saves you from rearranging bins five times in a row.
The interior height of the bins is worth noting too. The Vtopmart bins are about 2 inches tall, which is ideal for most junk drawer items but does mean that anything taller than that needs to either lie flat in the bin or live in a designated zone along the edge or back of the drawer. A box cutter, a long-handled screwdriver, or a full-size tape measure will likely need to rest flat. That is not a flaw in the bins, it is just the natural trade-off with shallow drawer organizers. The items that do not stand up still benefit from having a designated zone rather than free-floating among everything else.
One of the biggest advantages of modular clear plastic bins over a single fixed insert tray is the flexibility to move things around without any commitment. If you put your battery bin at the back-left corner and realize you grab batteries three times a week, you just slide it to the front. No adhesive, no damage, no drama. I rearranged my layout twice in the first ten days before landing on a configuration that felt completely natural, and I have not moved a bin since.
Step 5: Load the Bins, Place Them in the Drawer, and Label Every Single One
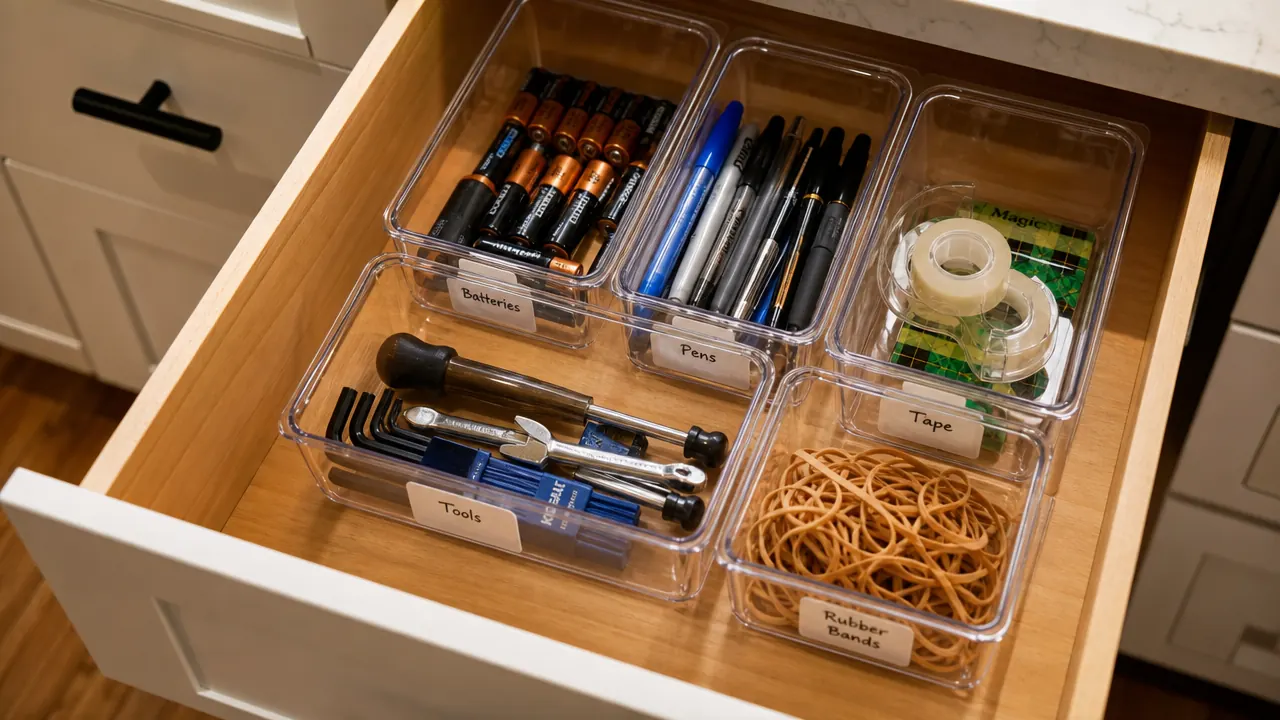
Now for the part that actually feels good. Load each sorted pile into its assigned bin, then place the bins in the drawer according to your layout. The rule for placement is simple: highest-traffic items go closest to the front edge of the drawer. My pens and scissors live right at the front because I reach for them multiple times a day. Batteries are mid-drawer because I grab them less often. Small hardware, rubber bands, and rarely-used tools live at the back where they are accessible but not in the way.
Once everything is placed, label each bin. This is the step most people skip entirely, and it is also the primary reason most organized drawers revert to chaos within a month. Labeling creates a visible rule. When your brain sees a bin that says Rubber Bands, it does not drop a stray battery into it, even in a hurry at 7am. The label removes the decision entirely. I use a small label maker for this, but a strip of masking tape and a permanent marker works just as well. The label just needs to be legible and visible when you open the drawer. Keep it simple: one or two words per bin is all you need.
Labeling creates a visible rule. When your brain sees a bin that says Rubber Bands, it does not drop a stray battery in it, even on a rushed Tuesday morning. The label removes the decision entirely.
What Else Helps Keep the Drawer Organized Long-Term
The bins do the structural work, but a couple of simple habits lock the system in for the long haul. First, build a 5-minute monthly reset into your routine. Once a month, glance in the drawer, pull anything that crept into the wrong bin, toss any items that are expired or broken, and check whether any bin is starting to overflow. If a bin is consistently overflowing, you either have too much of that category or you need a slightly larger bin for it. Both problems have quick solutions.
Second, resist the temptation to add a catch-all bin. The entire point of this system is that every item has a defined category. A general misc bin becomes a miniature junk drawer living inside your organized drawer, and it defeats the whole purpose. If something does not fit an existing category and you keep finding that thing in the drawer regularly, create a new labeled bin for that specific category. If it shows up once in a blue moon, it probably lives somewhere else in the house and wandered in.
Third, keep at least one lightly-loaded bin or a small open zone in the drawer. Giving new items a temporary landing spot prevents the system from feeling impossible to maintain. When that spot fills up, it is your signal to do a quick sort, not to add more bins. Breathing room inside the drawer is what makes it feel easy to use versus a rigid system you have to be careful around. Organization should reduce your mental load, not increase it.
If you want the full breakdown on how the Vtopmart bins perform across kitchen, bathroom, and office drawers, the Vtopmart drawer organizer review covers all four bin sizes with specific measurements, fit notes for standard US drawer sizes, and how they hold up after months of daily use. Worth reading before you buy if you have any non-standard drawer dimensions.
And if you are still weighing whether clear plastic bins are really the right call over bamboo inserts or adjustable metal dividers, the article on 10 reasons clear plastic drawer organizers finally fix the junk drawer problem lays out exactly why modular clear bins win for almost every household situation.
Ready to close that drawer and never cringe when you open it again?
The Vtopmart 25-piece set gives you four sizes and 25 total bins to mix, match, and fill every inch of your drawer layout. Crystal clear sides mean you can find what you need without touching a single thing. It is the single best kitchen drawer investment I have made, and it costs less than a takeout dinner for one.
Amazon Check Today's Price on Amazon →